
After signing up, log in to your account and go to your zSplit Dashboard. From the dashboard, select Properties to add your first rental property.
Your property is the main location where your units, tenants, bills, and payment requests will be organized. Each property can represent a rental home, basement rental, duplex, triplex, shared house, student rental, or any other property where expenses need to be split.
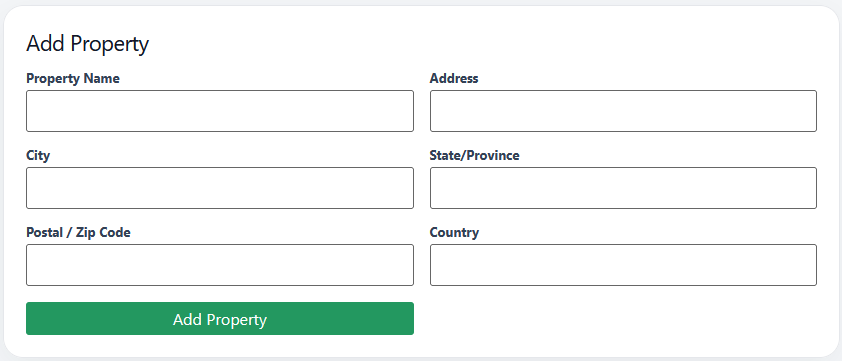
To add a property, enter the property details, including:
- Property name
- Address
- City
- State or province
- Postal or zip code
- Country
The property name can be simple and easy for you to recognize, such as “Main Street Rental,” “Basement Apartment,” or “Student House.” This name is mainly used to help you stay organized inside your zSplit account.
Once you submit the form, your property will be added and displayed below the property form. From there, you can continue setting up the property by adding units, bills, tenants, and split percentages.
Your plan determines how many properties you can manage:
- Starter: 1 property
- Pro: Up to 10 properties
- Pro Plus: Unlimited properties
If you reach your property limit, you may need to upgrade your plan before adding more properties. You can view available plans here: Choose your zSplit plan.
Keeping your properties organized is important because bills, tenants, units, and payment requests are connected to the property they belong to. If you manage more than one rental location, each property should be added separately.
After adding your property, stay on the Properties page. Below the property form, you will see your added property listed. Click on the property to expand it and view the setup options connected to that property.
Inside the expanded property area, you can add the rental units that belong to that property. A unit can be an apartment, basement unit, room, floor, suite, or any separate rental space connected to the property.
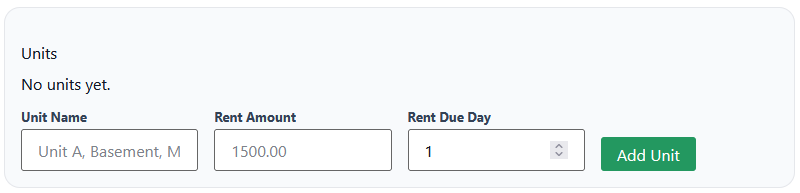
To add a unit, enter the following details:
- Unit name
- Rent amount
- Rent due day
The unit name should be something easy to recognize, such as “Basement Unit,” “Unit A,” “Main Floor,” “Room 1,” or “Upper Level.”
The rent amount is the monthly rent assigned to that unit. The rent due day is the day of the month when rent is normally due, such as the 1st, 15th, or another agreed date.
For Pro Plus users, the rent amount and rent due day can be used for rent reminder emails. This helps landlords send organized rent reminders to tenants based on the unit’s rent details.
After adding a unit, it will appear under the selected property. You can then continue setting up the unit by adding tenants and assigning split percentages.
If a property has multiple rental spaces, add each one as a separate unit. This keeps rent, tenants, bills, and payment requests organized properly inside zSplit.
After adding your property, stay on the Properties page. Below the property form, you will see your added property listed. Click on the property to expand it.
Inside the expanded property area, the Add Bill section appears below the Add Unit section. This is where you can add the bill types you want to split between units or tenants.
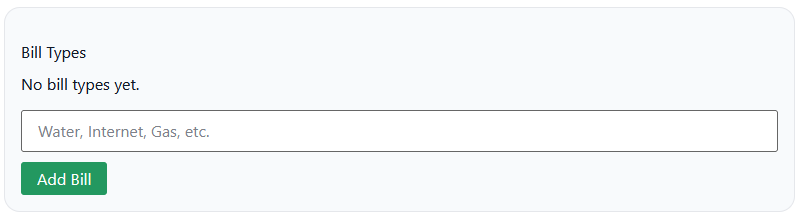
To add a bill, enter the bill type you want to track and split. Common examples include:
- Hydro
- Water
- Gas
- Internet
- Electricity
- Maintenance
- Parking
- Other shared property expenses
The bill type is the name of the expense you will enter amounts for later. For example, if you add “Hydro” as a bill type, you will be able to enter the monthly hydro amount when the bill arrives and use zSplit to calculate each tenant’s share.
At this stage, you are only creating the bill type. You are not entering the monthly bill amount yet. The actual amount is entered later when you are ready to send payment requests.
Adding bill types ahead of time keeps your property organized and makes the monthly billing process faster. Once your bills are set up, you can select them when entering bill amounts and sending payment requests.
After setting up your property and units, click the Tenants tab in your zSplit Dashboard. This is where you can add the people responsible for rent, utilities, or other shared expenses.
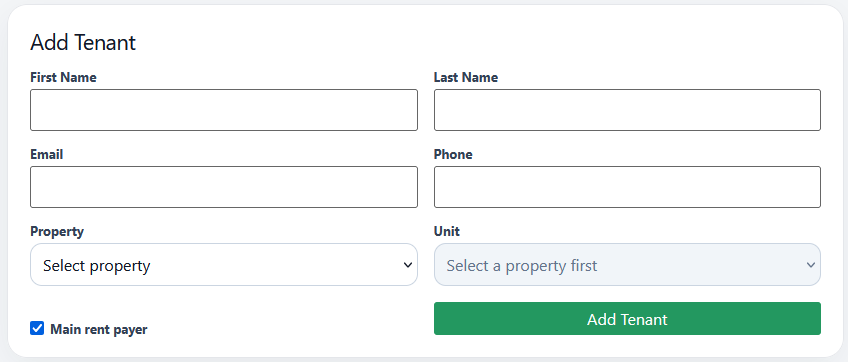
To add a tenant, enter the tenant’s details:
- First name
- Last name
- Email address
- Phone number, optional
- Property
- Unit
After selecting a property, choose the unit that the tenant belongs to. This connects the tenant to the correct rental space so zSplit can calculate payment requests properly.
The tenant’s email address is important because zSplit uses it to send payment requests and reminders. Make sure the email is entered correctly before sending any payment requests.
If you are using Pro Plus, you can also choose whether the tenant is the main rent payer for the unit. This is used for rent reminders. If a unit has multiple tenants, the main rent payer is the person who should receive the rent reminder email for that unit.
You can add one or multiple tenants to a unit depending on how you manage payments.
If bills are split by unit, you may only need to add one tenant for each unit. For example, if Unit A is responsible for 50% of the hydro bill and Unit B is responsible for 50%, zSplit can calculate the amount owed by unit.
If expenses need to be split further between tenants within the same unit, you can add multiple tenants to that unit. This is useful when roommates share a unit and each person is responsible for a percentage of that unit’s share.
Once tenants are added, they will be available when setting split percentages, sending payment requests, tracking payments, and sending reminders.
After adding a tenant, the tenant will appear under Active Tenants on the Tenants page. To choose how much of each bill the tenant is responsible for, click Manage Splits for that tenant.
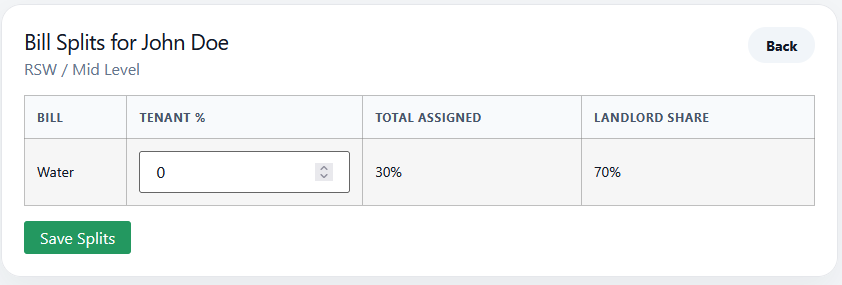
Inside the split settings area, you will see the bills that are available for the property connected to that tenant. These are the bill types you added earlier, such as hydro, water, gas, internet, or other shared expenses.
Under Tenant %, enter the percentage of each bill that the tenant is responsible for. For example, if a tenant is responsible for 50% of the hydro bill, enter 50 beside that bill.
The Total Assigned amount shows how much of that bill has already been assigned across all tenants. This helps you confirm whether the full bill has been split properly.
The Landlord Share amount shows the percentage of the bill that has not been assigned to tenants. Any unassigned portion becomes the landlord’s responsibility.
For example:
- If tenants are assigned 100% of a bill, the landlord share is 0%.
- If tenants are assigned 75% of a bill, the remaining 25% is the landlord share.
- If only one tenant is responsible for the full bill, enter 100% for that tenant.
After entering or updating the tenant’s percentages, click Save Splits to save the changes.
It is important to review split percentages carefully before sending payment requests. zSplit uses these percentages to calculate how much each tenant owes when you enter the bill amount.
After your property, units, bills, tenants, and split percentages are set up, you can send payment requests to tenants.
To begin, select Send Requests from the zSplit Dashboard navigation. On the Send Requests page, select the property you want to send requests for, then click Load Property.
Once the property is loaded, you can choose the billing month and due date for the payment requests. The billing month helps identify which month the request is for, and the due date tells tenants when payment is expected.
Next, enter the bill amounts for the bills you want to send. These are the actual amounts from your monthly bills, such as hydro, gas, water, internet, or other shared expenses.
zSplit will use the split percentages you assigned earlier to calculate how much each tenant owes. The tenant’s assigned percentage will be visible next to the tenant amount so you can review the calculation before sending.
Before sending, scroll to the bottom of the page where it says Current Tenant Splits. This section shows a full breakdown of the tenant splits for the selected property. Reviewing this area can help confirm that the percentages are set up correctly before payment requests are emailed.
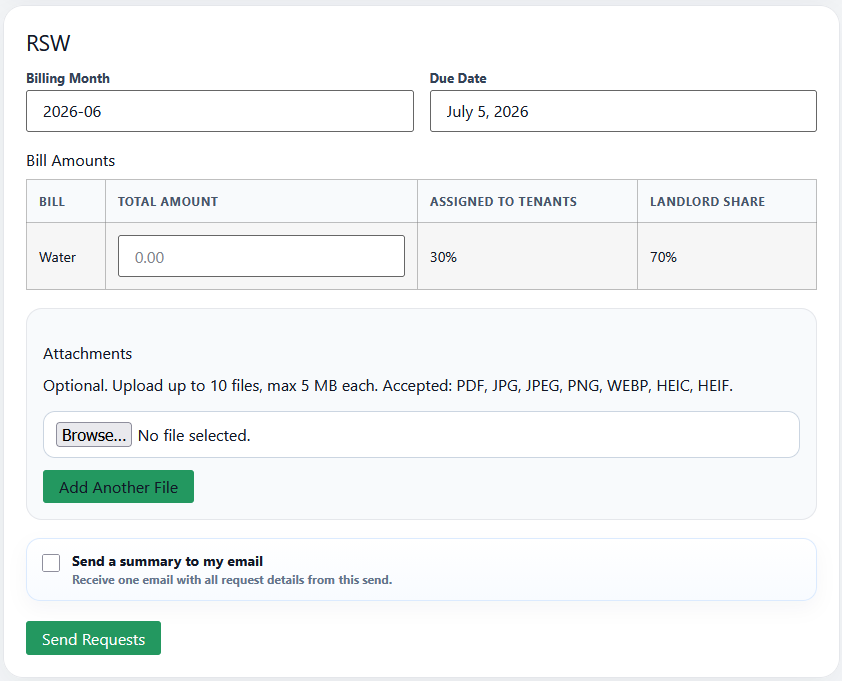
If you are on the Pro or Pro Plus plan, you can also add attachments to the payment request. Attachments can include PDF files or images of the bills, allowing tenants to receive copies and verify the amounts if they choose.
Attachments are not available on the Starter plan.
The Summary checkbox allows landlords to receive one email summary showing all payment requests that were sent to tenants. This is helpful if you want a copy of what was sent and a quick record of the requests for that billing period.
Once everything looks correct, click Send Requests. zSplit will email each tenant their payment request based on the bill amounts and split percentages entered.
Before sending, always review the billing month, due date, bill amounts, tenant emails, and split percentages to make sure everything is accurate.